How to Run Commercial Shade Sail Perimeter Wire
Most of our shade sails are designed with a perimeter pocket for wire rope to be fed through. This wire rope is very important in the tensioning of the shade sail.
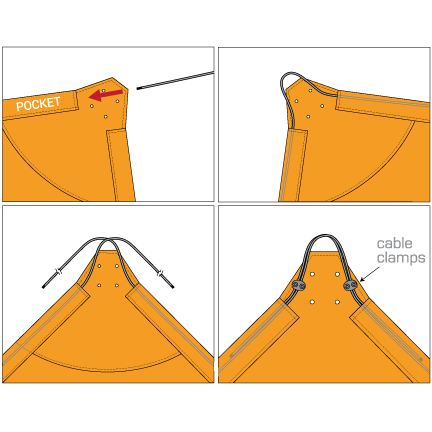
- Find a flat area to completely lay your shade sail out.
- To feed the wire rope, start at any corner and run the wire rope through each perimeter pocket all the way around the sail until it returns to the corner where you began. It may be helpful to have someone make sure the side of the sail remains flat and straight, as this will help the wire rope slide through the pocket easier. Take special care to exit and re-enter the pocket at each corner, leaving enough wire rope looped at each corner so as to easily install each corner bracket.
- After you are finished running the wire rope through the perimeter, you will be left with two ends of wire rope hanging out of the final corner. These two ends of the wire rope are typically 4 - 6 feet long, but may vary depending on the size of sail you purchase. Ensure that both wire rope ends are the same length before proceeding to the next step. Feed the two ends of the wire rope into the pocket, as though the wire rope were to continue going around the sail again, so the wire rope ends now overlap.
- Loosely attach the wire rope clamps to the wire rope only, on either side of the corner bracket location, so that you are binding the overlapping wire rope in two places. Make sure that the nuts are facing up, so that they will be on the skyward side when the sail is installed. The clamps should not be applying any pressure to the wire rope at this point, so as to allow the wire rope to slide freely during the first phase of installation.
Follow Us
CONTACT US
Tenshon
8743 E Pecos Rd, Ste 122
Mesa, Arizona 85212
(480) 663-3166
(480) 663-3237 fax
info@tenshon.com
© 2026 Tenshon.