How to Tension a Shade Sail
As you can probably guess, tension is key to the functionality of tensile fabric shade canopies. Without it, shade sails sag or droop, especially in the centers, affecting the aesthetics and longevity of the sail. Introducing tension to a shade sail, however, isn't quite as simple as just pulling it tight at each corner. We focus on three main tensioning techniques:
Learn how each of these techniques work together to provide a great looking and long lasting sail.
Perimeter Wire Rope
Wire rope is an essential part of our shade sails. It runs through a pocket sewn into the perimeter of every sail. Without a wire rope around the perimeter, tension applied at each attachment point is not distributed evenly in the sail, creating areas of concentrated stress around the corners. This causes the center to sag and increases the risk of tearing at the corners.
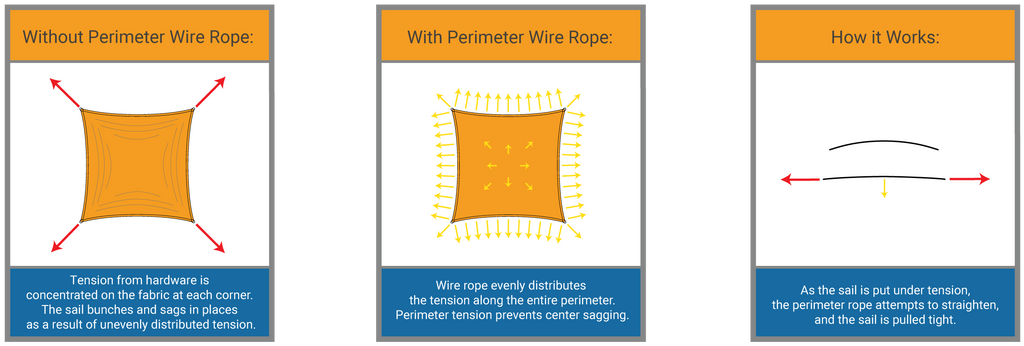
When a wire rope is used, the pulling force from the attachment hardware is transferred to the wire rope, rather than directly to the fabric. That force is then distributed throughout the perimeter of the sail, where the wire rope runs through a pocket. As the curved edges of the sail are pulled taut, the wire rope and fabric attempt to straighten out, which pulls the center of the sail, distributing the tension across the full surface of the fabric.
Height Variation
Height variation in shade sails gives them a look unique to tensile fabric membranes. But the purpose behind that twist is more than just aesthetic. It is crucial for maintaining tension and preventing sagging.
Good height variation is obtained by alternating high and low attachment points. This gives the sail a shape called a hyperbolic parabola. Because the two high points are opposite each other, they work together to pull the sail up and out, while the low points pull the sail down and out. The sum of these opposing forces creates tension in the sail and suspends the center, preventing sagging. This also prevents the sail from catching wind.
What is optimal variation? Our rule of thumb is 1:5. That is, 1' of height variation for every 5' of span. This is the reasoning behind our 7' and 10' standard poles. Take an SS-15 for example: the approximate 15' spans call for 3' of height variation.
What about triangles? Try as you might, you won't be getting a twist out of a three-sided sail. However, a variation in height will still help minimize the effects of sagging, as the lowest point will be an attachment point as opposed to the center of the sail.

An added bonus to sloping is that it makes for better rain shed. While our fabric is a knit of HDPE fibers, and therefore somewhat porous, much of the water that falls on a shade sail will run off if it has a lower place to go. In a flat sail, that lower place will be the center and that pooling water will not only weigh down the sail, but will drip through it. Add a little height variation and that water will seek the lower attachment points and edges to run off.
Tensioning Hardware
Corner hardware is the most important source of tension in a sail. Tenshon sells three different types of corner hardware, each with their own unique benefits and mode of achieving the desired tension.
Turnbuckles
A turnbuckle consists of two eye-bolts with opposite thread inside a center body free to spin. Due to the opposite thread directions of the two eye-bolts, rotating the body one direction brings the bolts together, thus tightening the sail, and turning it the other direction lets the tension out. Using turnbuckles at every attachment allows for freedom to adjust the tension in the sail at each corner. Our turnbuckles–including a d-shackle on each end–are 7.5" closed and 10" open, which works great for any of our standard shade sails or custom shade sails of comparable size. Learn how to install a shade sail with turnbuckles here.
Pulleys
If you're looking for an easy up, easy down option, we've got just what you need! Pulleys make for super easy installs because there is no need for lubricant or tools, or additional tensioning assistance from a come-along or similar winch. We pattern for a 15" offset, allowing plenty of room to attach the pulley to each corner of the sail and then to each attachment point, before any tension is applied. Once the sail is in place, pull the rope tight at each corner and tie off the loose ends. A 4:1 mechanical advantage makes tensioning your sail a breeze, and the take down is just as simple! Like our turnbuckles, pulleys are great for shade sails within our standard size range. Learn how to install a shade sail with pulleys here.
Commercial Brackets
Commercial brackets are used in any custom projects larger than any of our standards. When it comes to large sails, turnbuckles and pulleys just won't do the trick. We've designed our commercial brackets to achieve 18" of take and hold up to the added stress of large sails. Learn how to install a shade sail with commercial brackets here.

Choosing the Right Hardware
Turnbuckles and pulleys are both fantastic corner hardware for standard shade sails and customs within that same size range, so choosing between the two is really a matter of cost vs. convenience. If you're looking for the best price, turnbuckles will be your best option. If you want better functionality and easier install, go for pulleys. As for larger sails, you really do need to use commercial brackets for best performance and safety.
Follow Us
CONTACT US
Tenshon
8743 E Pecos Rd, Ste 122
Mesa, Arizona 85212
(480) 663-3166
(480) 663-3237 fax
info@tenshon.com
© 2025 Tenshon.